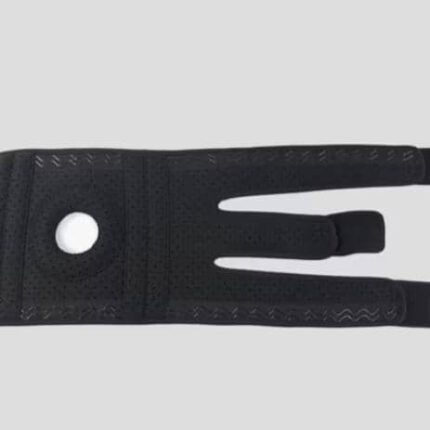
Stabilizing knee brace
The image shows a neoprene stabilizing knee brace with a patellar opening. Its main features are:
Material and Comfort:
- Made of neoprene, it provides a thermo-compression effect that helps maintain body heat and promote blood circulation, which can reduce the risk of strains and aid in the resolution of edema.
- The 3 mm neoprene ensures comfort and flexibility, ideal for sports or everyday use.
- Some models incorporate a breathable and sweat-wicking SBR fabric lining for optimal comfort.
Support and Stability:
- The patellar opening helps keep the kneecap aligned and reduce pressure on it, thus relieving pain and stabilizing the joint.
- Lateral stabilizers or spiral supports can be integrated to improve knee stability and reduce the risk of injury. The adjustable strap systems (double, quadruple, or tabs) allow for compression and support to be adjusted to the user’s needs, ensuring the knee brace stays in place without slipping.
Indications and Benefits:
- Ideal for injury prevention, post-operative and post-traumatic treatment, and pain relief from conditions such as patellar syndrome, ligament sprains, or chondromalacia.
- Provides moderate support to maintain physical activity while protecting the knee.

Laminar Hook
Immobilization & Stabilization: They are used to secure adjacent vertebrae and create a rigid frame-like system for the spine.
Material: Typically made of metal, such as titanium.
Connection to Rods: The hook connects to a longitudinal rod via a small lid or screw, which is tightened to form the complete fixation system.
Types of Laminar Hooks
Supralaminar Hooks: These are placed over the superior (top) edge of the lamina, pointing downwards (caudally).
Infralaminar Hooks: These are placed under the inferior (bottom) edge of the lamina, pointing upwards (cranially).
Transverse Process Hooks: A variation of the laminar hook that can be placed down-going on the superior edge of the transverse process in the thoracic spine.
Clinical Applications
Spinal Fusion: They provide a stable anchor for the spine during posterior spinal fusion (PSF) to promote bone healing and fusion.

Polyaxial Elliac screws.
Polyaxial Head: The screw has a spherical head enclosed in a housing, allowing it to pivot along multiple axes relative to the housing.
Flexibility in Placement: This polyaxial nature provides intra-operative flexibility, enabling the surgeon to angle the screw to best fit the complex anatomy of the iliac crest.
Enhanced Stability: Polyaxial screws, when used with connecting rods and cross members, provide 3-dimensional stability and contribute to the rigidity and pull-out resistance of the construct.
Spinopelvic Fixation: They are a key component in lumbosacral fusion and spinopelvic fixation, anchoring the spine to the pelvis after complex procedures like sacral tumor resection or fractures.
Material: Often made from titanium or titanium alloys, which are suitable for bone tissue interaction and offer good mechanical properties for implants.

Spinal pre cut rod
Titanium Alloys: Offer moderate stiffness and strength.
Cobalt Chrome (CoCr): Provides high stiffness and yield strength.
Stainless Steel: A relatively easy-to-bend material with good strength.
Design and Shaping
Pre-cut Length: Unlike longer rods that must be cut in the operating room, pre-cut rods are a specific length, reducing surgical time and the risk of errors during the procedure.
Pre-bent Options: Some systems offer pre-bent rods to achieve the desired spinal curvature (lordosis), which can improve biomechanics and lower the overall height of the spinal construct.
Patient-Specific Rods (PSRs): These are custom-designed and manufactured to the exact patient’s spinal anatomy, offering a more precise fit and potentially better correction of deformities.

Retractor blade handle for cervical retr
Ergonomics and Design: Handles can be hand-held for manual retraction or designed to clip into table-mounted arms, allowing for hands-free, stable exposure of the surgical site.
Secure Blade Attachment: A positive engagement system, such as a ball-snap or cross-cut design, ensures a rigid connection between the blade and the handle, preventing blade movement and rotation during surgery.
Adjustable Locking Mechanisms:
Ratchet/Speedlock: These mechanisms hold the blade open in a fixed position for consistent retraction and tissue exposure.
Pivoting and Angle Adjustment: Some systems offer pivoting blades or handles with knobs that allow for precise up-or-down adjustments of the blade angle (e.g., ±45°) to adapt to patient anatomy.

Self retaining cervical retractor frame.
Hands-Free Operation: The primary feature is the ability to hold tissues in place mechanically, freeing the surgeon’s hands for other tasks.
Modular Design: Systems are often modular, allowing for customization with various blade lengths and types to suit different patient anatomies and surgical needs.
Flexible & Malleable Frame Components: Some systems use flexible, belt-like arms or malleable hinges that can be easily positioned and adjusted to fit the patient’s specific anatomy.
Self-Retaining Mechanism: The frame uses a mechanical action, such as a ratchet lock or an integrated pinion mechanism, to maintain tension and stability once the retractor is positioned.
Low-Profile Design: A streamlined and low-profile design improves visualization by allowing greater access to the surgical site and reduces obstruction for the surgical team.
Radiolucent Materials: Many systems are made from lightweight, radiolucent materials like titanium or other

T Clamp
Temporary Stabilization: The primary use of T-clamps is for the temporary fixation of complex fractures, especially in unstable pelvic and spinal injuries, to stabilize the area before definitive surgery.
Access for Other Procedures: The design of the T-clamp allows for access to the abdomen, groin, and pelvis for emergent procedures like angiography or endovascular repair without hindering surgical access.
Spinal Fixation: In the spine, a T-clamp is part of a system that uses a band, clamp, and set screw to simplify the correction of spinal pathologies by providing immediate stabilization.
Design and Materials
T-Shape: The characteristic T-shape of the clamp is designed to increase the contact area with the bone, helping to securely guide and attach cables while avoiding loosening.

Sandwich plate.
Composite Construction: Composed of two composite face sheets (e.g., carbon fiber, glass fiber) and a lightweight core material (e.g., foam, honeycomb, balsa wood).
High Specific Strength and Stiffness: The sandwich structure provides excellent strength and stiffness for its weight, making it ideal for lightweight applications.
Low Construction Weight: The use of a lightweight core significantly reduces the overall weight of the structure.
Load Distribution: The face sheets and core work together to distribute loads effectively across the structure.
Mechanical & Functional Characteristics
Vibration Isolation: They possess excellent vibration damping properties, which reduce noise transmission and enhance comfort.
Crashworthiness: The design enhances crashworthiness, making them resistant to impacts.
Thermal Insulation: Sandwich panels act as thermal insulators, helping to maintain consistent internal temperatures.

Distal radius fixator
Adjustability: Components and joints are designed for easy adjustment in multiple planes, allowing for accurate reduction of the fracture.
Lightweight and Radiolucent Materials: Carbon fiber rods are lightweight and transparent to X-rays, improving post-operative monitoring.
Versatility: Modular components and different fixator types enable the system to be adapted for a wide range of distal radius fracture patterns.
Ligamentotaxis: The use of traction can help reduce comminution and maintain the space within the joint, supporting the natural healing process.
Augmentation: K-wires can be added to external fixation to provide increased stability, prevent late collapse of the fracture, and aid in the reduction of impacted fragments.
Application Considerations
Soft Tissue Protection: Incisions are made carefully, and soft tissue protectors are used to prevent damage to nerves, vessels, and tendons.

Mini rail vertical axis
Purpose: Used for the treatment of fractures, bone lengthening, and correction of complex soft tissue and bone deformities in small bones like those in the hand and foot.
Mechanism: A hinged system that provides controlled compression and distraction of the bone segments.
Key Feature: The hinge allows for adjustment in a horizontal or vertical plane, offering flexibility during treatment.
Application: Treats conditions such as foot or hand arthrodesis and hand/wrist contractures.
Accessories: Utilizes self-drilling screws or threaded wires for bone fixation.

Mini rail horizontal axis
Purpose: Used for temporary and permanent fixation of open and contaminated fractures, nonunions, malunions, and osteotomies, especially in metacarpal and metatarsal bones.
Design: Features self-drilling screws or threaded wires for bone fixation, and a compact rail system for stable support.
Benefits:
- Minimal damage to blood supply and soft tissue. Rapid application in emergencies.
- Allows for fracture reduction and stable fixation without surgery, and even supports bone transport.
- Suitable for high-risk infection situations.
In the context of linear guides:
Purpose: To provide smooth and silent linear motion with high precision.
Design: Utilizes cold-drawn carbon steel profiles with induction-hardened raceways and adjustable rollers for preload.
Benefits:
Extremely compact, saving valuable space.
Smooth and quiet operation.
An adaptive design that allows for easy customization.

fixing element 4 mm hole with centrally tapped bore
Mark the center: Use a center punch and hammer to create a small dimple where the hole will be drilled. This prevents the drill bit from wandering.
Chamfer the hole: Create a small chamfer on the edge of the pilot hole. This helps the tap enter the hole more easily and prevents burrs from interfering with the threads.
2. Drilling
Select the correct drill bit: For a 4mm tapped bore (which usually indicates an M4 thread), a pilot hole drill size of 3.3 mm is needed.
Drill the pilot hole: Securely hold the material and the drill at a right angle to the surface. Use a low drill speed to maintain control and prevent the bit from breaking.
3. Tapping
Secure the tap: Attach the tap to a tap handle or a drill press.
Start the tap: Align the tap with the center of the pilot hole and begin turning it by hand or using the drill press.